Done!
Was a tad more painful than expected, had to do some re-plumbing of the ChipChop lib vs. 1.5x and the mqtt client code but now my friend you have a D1 communicating simultaneously with ChipChop and HA ;-)
I was a bit concerned that the D1 would not have enough juice as the secure ssl/tls encryption with ChipChop eats up the ram like a free buffet but my little D1 mini is happily running everything and still has 5-6kb of ram to spare (could fit 3x Arduino Nano's in that space).
I've also loaded the whole caboodle of latest plugins so you also have:
- WiFi Portal - handles wifi and ssid can be re-programmed from a phone if you change the device location
- KeepAlive - watches the connectivity in general and can restart the wifi or the entire esp automatically
- Prefs Manager - saves & loads variables in the flash so things can be re-programmed on the fly (I've made a small example so you can change on-the-fly the lowPressAlarmLimit & highPressAlarmLimit straight from the app or Dev Console)
- AutoPin - automatic digital pin control (just a simple example control of the D1 led but can do a lot more)
- OTA
- Timers - does a setInterval() and setTimeout() so no need to mess with millis() in the loop
I've used a little oled library I've been using for years instead of yours, was a bit quicker. Didn't have the time to test on a screen but should show icons & psi and also the date/time and connection signal with ChipChop.
If you don't like it or it doesn't work you can just switch to the one you've used.
Note: I've tested all this through my personal mqtt server, it's not a baseline "broker" but a low level stuff so I can see the data packets and they look correctly formed so I would assume it should work with whatever HA is using, probably Mosquito?
If it doesn't work and HA complains I'd have to probably tweak few parameters and try again, it can only be the QoS or Dup or some crap like that.
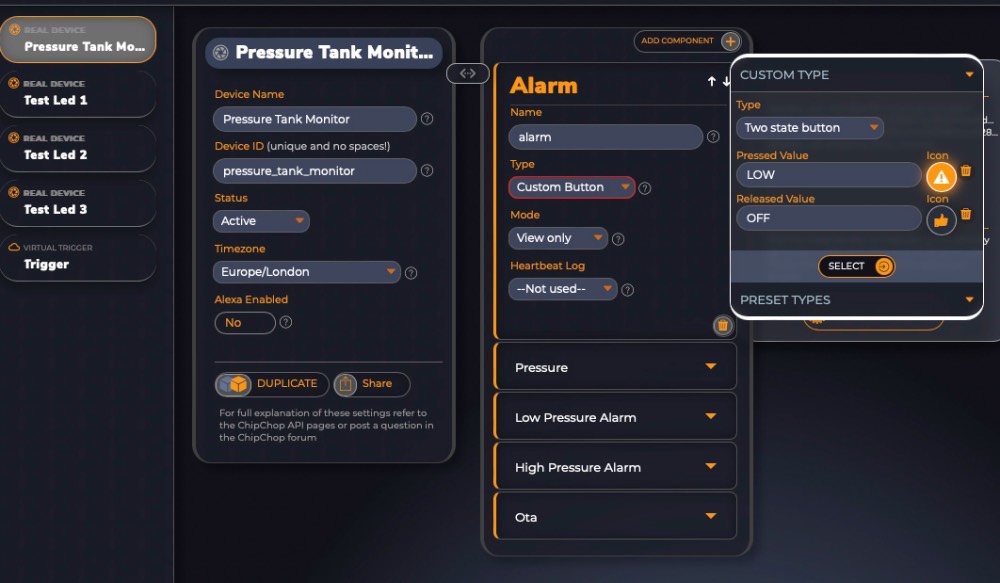
Instructions1. First create a new device in the Dev Console:
name:
Pressure Tank Monitor Device ID:
pressure_tank_monitor (<<< exactly like this)
Components:
alarm type: Custom Button > Pressed Value "LOW", Released value "OFF" (see screenshot, use whatever icons you fancy)
mode: view only
pressure type: numeric value
mode: view only
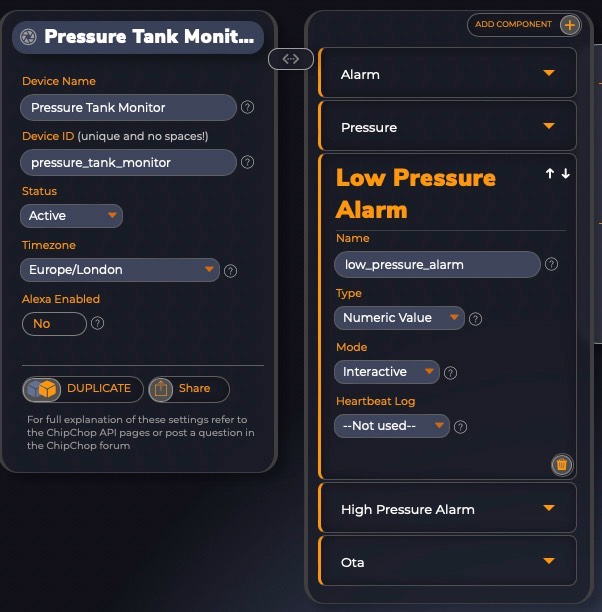
low_pressure_alarm type: numeric value
mode: Interactive
high_pressure_alarm type: numeric value
mode: Interactive
ota type: text value
mode: Interactive
The low_pressure_alarm & high_pressure_alarm can be used to dynamically change the variables directly from ChipChop so make sure they are set as mode: Interactive
2.Download this: https://chipchop.io/various/steve_e/Pressure_Monitor.zip
Unzip and copy into Arduino IDE and then edit the main ino file.
You need to add the missing bits of info:
- ip
- auth-code
- wifi ssid & pass
Compile and hopefully there will be no errors and take whatever precautions you need before you push this onto the D1 fully ...can you do a dry-run test with a different D1 and a dummy device in HA?
Let me know how it goes
G